
Still deciding? See what AI Course Creator in Continuum Learn can do for your organisation.
Continuum Learn can draft a whole course for you. You describe the topic, or upload your own documents, check the outline it proposes, and the lesson content is written in the background. You then edit the draft in the normal course builder.
Use it to get from a blank page to a first draft quickly. The result is a starting point, not a finished course.
Who can do this: team admins and authors, from Create > Courses. Some AI features depend on your plan.
Always review AI output. AI can get facts, figures, names and regulations wrong, and can sound confident while doing it. Read every lesson and check anything a learner might rely on before you publish.
Start a course with AI
- Go to Create > Courses and click New Course.
- Choose Create with AI.
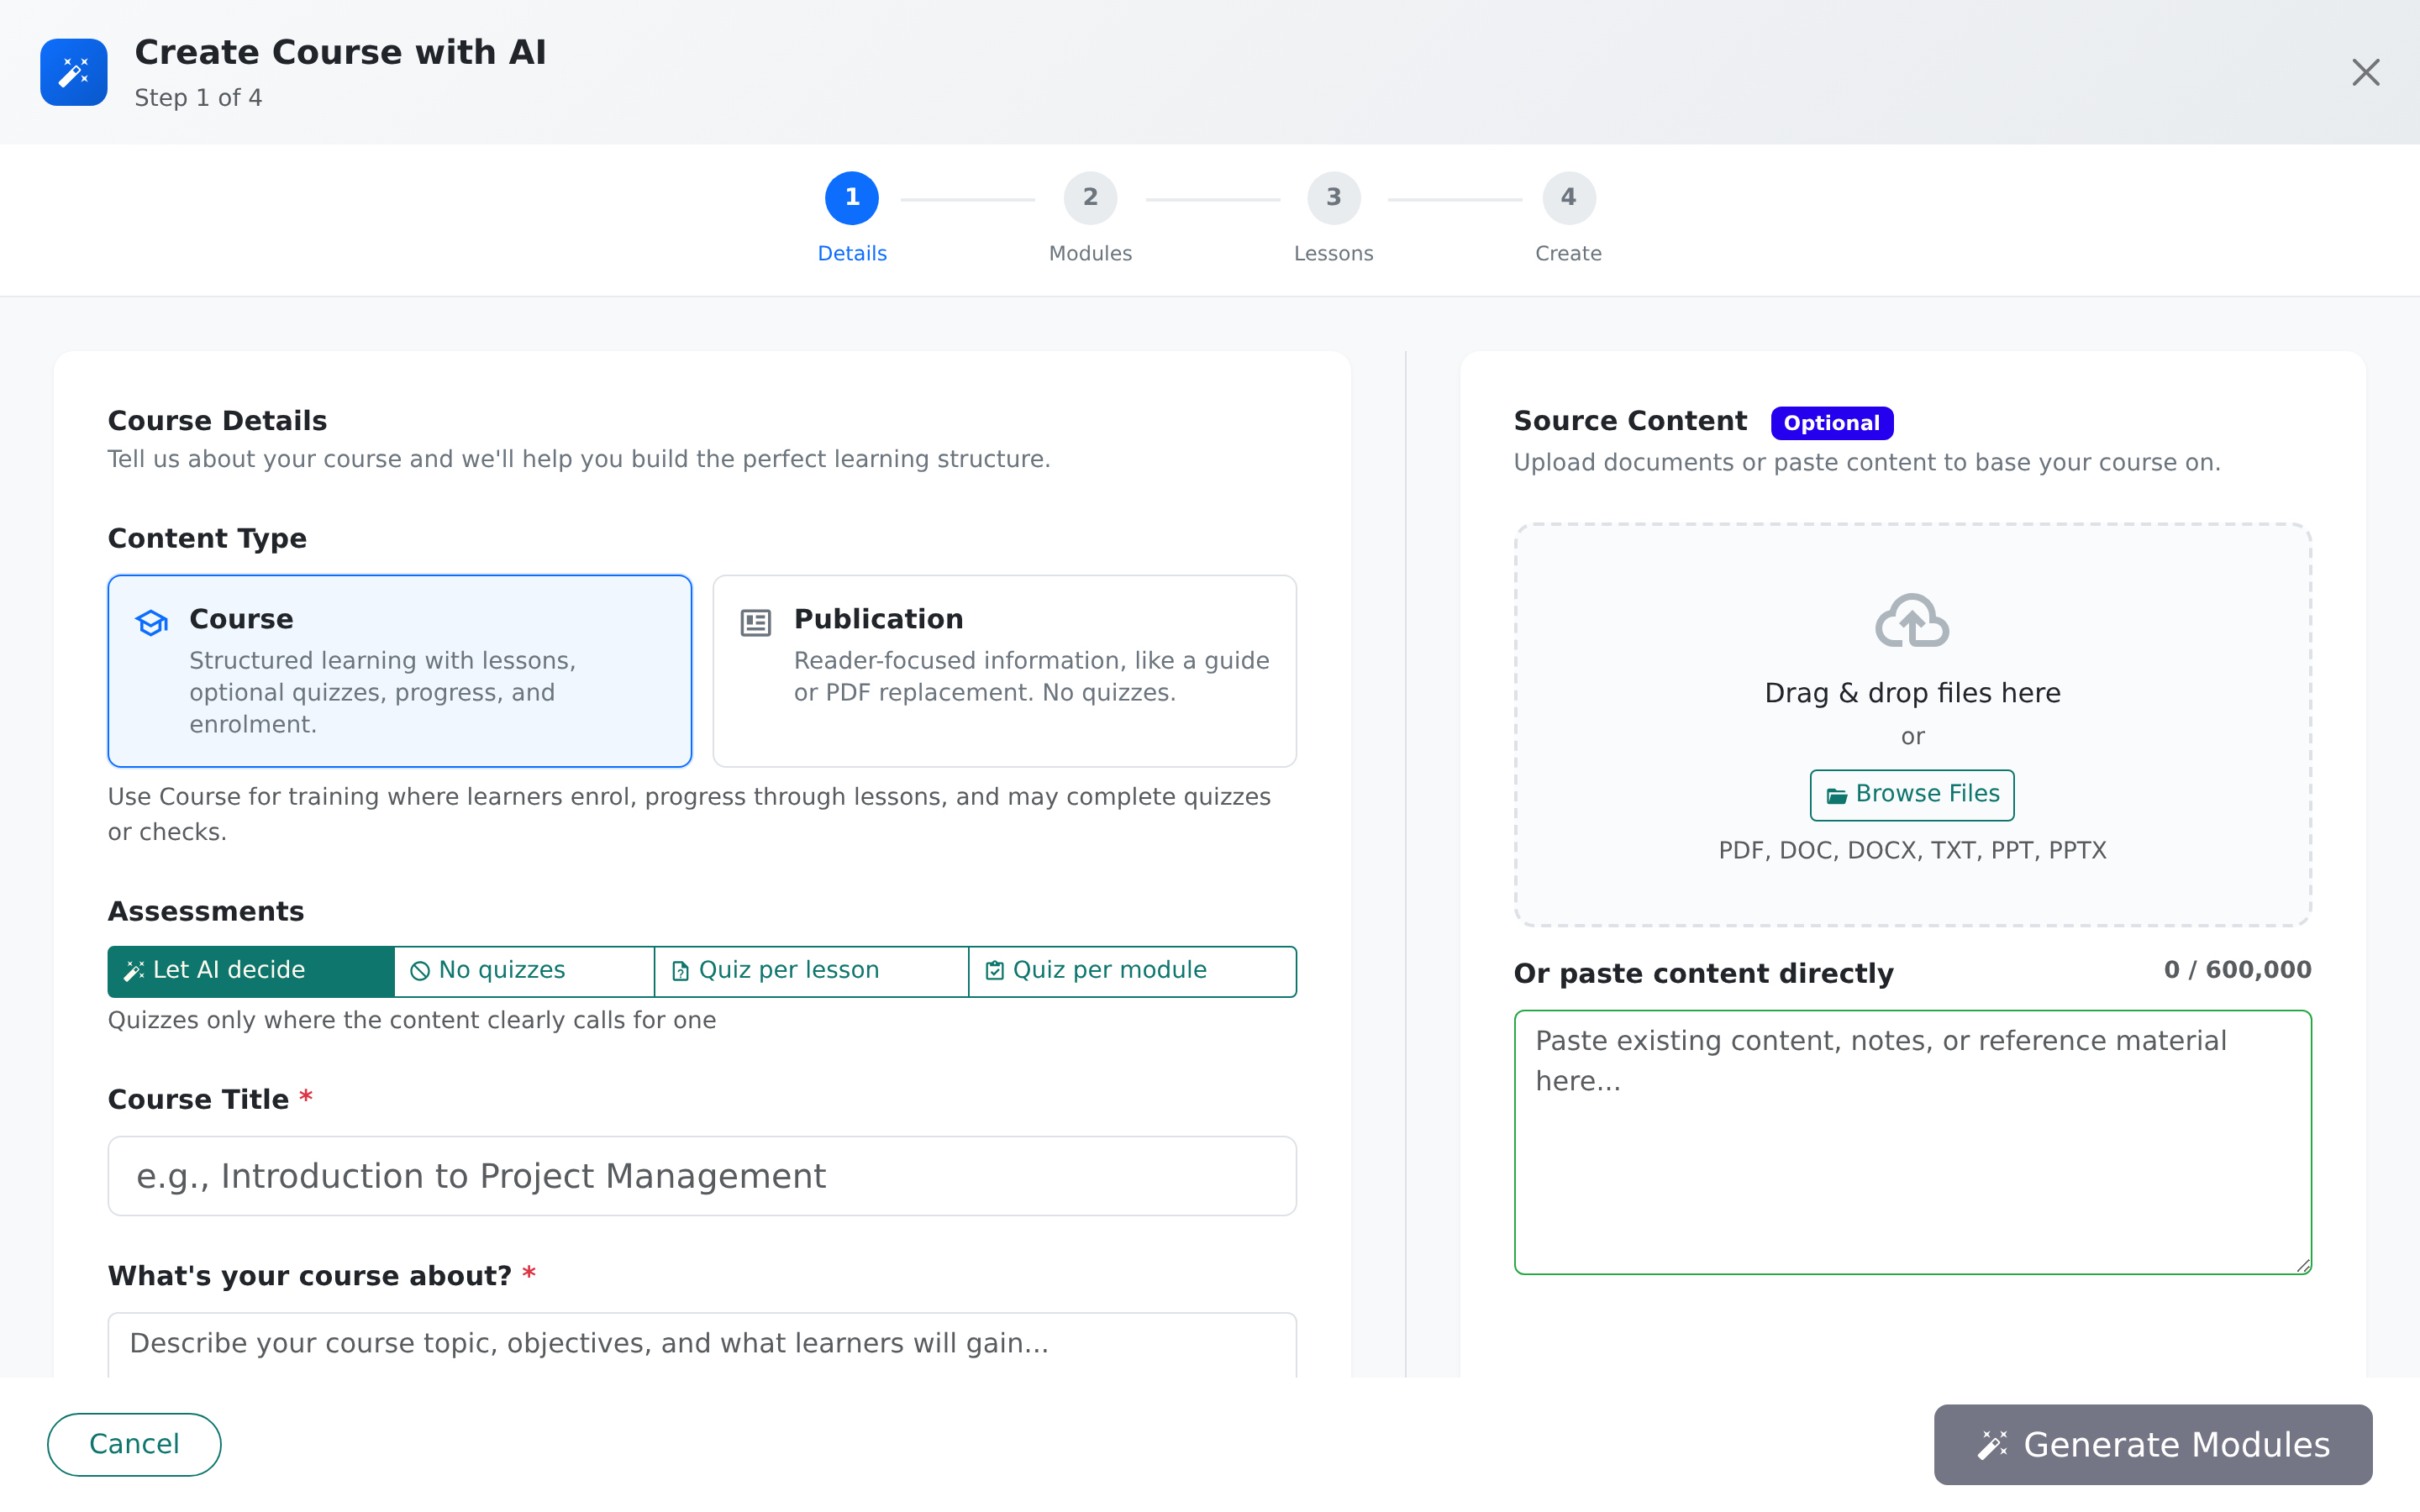
- Fill in the Details step (see the table below).
- Click Generate Modules.
| Field | What to enter |
|---|---|
| Content Type | Course for structured learning with lessons and optional quizzes. Publication for reader-focused information such as a guide, with no quizzes. |
| Assessments | Courses only. Let AI decide, No quizzes, Quiz per lesson or Quiz per module. |
| Course Title | Required. |
| What's your course about? | Required unless you add a document. Describe the topic, goals and what learners will gain. |
| Target Audience | Optional, for example "beginners" or "managers". |
| Learning Objectives | Optional. What learners should be able to do afterwards. |
There is no setting for course length. The AI decides how many modules and lessons to propose, and you can add or remove them in the next steps.
Add your own source material
The Source Content panel is optional, but it makes the course much closer to your own material.
- Upload documents: drag files in or click Browse Files. You can upload PDF, DOC, DOCX, TXT, PPT and PPTX files, each up to 32 MB. You can add several. Continuum reads the text out of each one first. Long documents can take a few minutes, and you will see its progress next to the file name.
- Paste content: paste notes or text into Or paste content directly, up to 600,000 characters.
- If you give a document but leave the title and topic blank, Continuum suggests them from the document. You can change the suggestions.
Once there is source material, choose How closely should AI follow the source?
| Setting | What it does |
|---|---|
| Exact | Rebuilds the document one-to-one. Its own headings become the modules and lessons, in the same order. |
| Strict | Reproduces the source in full, keeping every point, figure and named procedure. |
| Balanced | Follows the source's topics and structure but rewrites it as teaching material. |
| Loose | Uses the source as a starting point and adds substantial material of its own. |
Choose Exact or Strict for compliance or policy content where wording matters. Choose Loose only when you want the AI to bring its own ideas.
Review and edit the outline
You get two review screens before any lesson is written. This is the cheapest moment to change things.
- Review Course Modules: edit the Course Title and summary, rename modules, edit their descriptions, drag them into a new order, delete them, or click Add Module.
- Click Generate Lessons. The AI proposes lessons for each module.
- Review Course Lessons: rename lessons, edit their short descriptions, drag them between modules, delete them, or click Add Lesson. Expand All and Collapse All help with long courses.
- Click Continue.
On both screens the AI Assistant chat lets you ask for changes in plain English, such as "Add a module about security", "Make the lessons shorter" or "Add more lessons to module 1". Press Enter to send.
If you uploaded a document, there is one more check: Source coverage. It shows how the pages of your document map onto the modules, so you can confirm nothing important is missing. Pages can be left out on purpose, such as a cover page or index. Click Leave … out & continue to skip any that remain unassigned.
Choose how the lessons are filled
On the last step you choose:
- Generate with AI (recommended): the AI writes content for every lesson in the background.
- Create Manually: Continuum builds the module and lesson structure only, and you add the content yourself in the course builder.
Click Create Course. When it finishes, choose Go to Course or Stay Here.
What you see while lessons are written
Lesson writing runs in the background. You can close the window, leave the page and carry on with other work.
- On Create > Courses, the course card shows a badge with the current stage and a count such as "3/12".
- On the course's own page, an AI Content Generation in Progress panel shows how many lessons are done, how many are being written now, a progress bar and the current stage. Stages include Planning cross-module boundaries, Planning lesson boundaries, Generating content, Reviewing for overlap, Reworking after review and Generating assessment.
- A message appears when generation is complete.
The review stages check that lessons do not repeat each other and that nothing you required is missing.
Retry lessons that failed
Sometimes individual lessons fail, for example after a temporary fault. The panel then shows how many failed. Click Why? beside Failed for the details, then click Retry Failed. Only the failed lessons are redone. The others are left alone.
If some lessons finished but were still flagged by the automated review, the panel shows Completed with review issues. Those lessons are kept. Click Why? to see what was flagged, then either edit them yourself or click Retry Review Issues to regenerate them.
If a retry is refused because your AI allowance has run out, the panel tells you (see below).
Other AI helpers in the builder
| Where | What it does |
|---|---|
| Create > Courses > New Course > Create with AI | The full wizard above. |
| Generate with AI on an empty course | Appears on a course with no modules. Describe the topic, audience and objectives, optionally add source text or files, and review the proposed outline before it is added. |
| AI button in the lesson editor toolbar | Opens AI Lesson Content Generator. Choose From Scratch (based on the lesson's context) or From Source Content (paste text, then pick how closely to follow it), add optional Additional Instructions, and preview the result. Click Add to Lesson to keep it, Regenerate to try again, or Edit Requirements to change your brief. |
| Generate with AI in a quiz block | Writes quiz questions from the lesson's existing content. If the quiz already has questions, you are asked to confirm before they are replaced. The lesson needs some content first. Quizzes are not available in publications. |
| AI Summary (course Settings, Content tab, beside Introduction Text) | Reads your course and suggests an introduction. You can edit it before you click Apply Summary. |
| AI Generate in the image picker | Describe the image you want and click Generate. Preview it, then use it or Regenerate. An AI Image block in the builder does the same. |
| Translate with AI | Suggests translations for course folder names in the language settings of the folder editor. Check them before saving. |
Nothing from these helpers is published automatically. You always see the result and choose whether to keep it.
Import a course written by ChatGPT, Grok or Claude
If you prefer to write the course in an outside AI tool, you can paste the result straight in. This does not use your Continuum AI allowance.
- Open the course in Create > Courses and click Import JSON below the module list.
- Click Download the format guide for your AI tool. This file tells the AI exactly how to lay out the course. It covers the available lesson content types, such as text, lists, accordions, flashcards, tables, images, flowcharts, quizzes and buttons.
- Give the guide to your AI tool, together with your brief, and ask it to reply with the course only.
- Paste its reply into the box and click Check. Continuum lists any problems for you to fix, or confirms what it is ready to import.
- Click Import.
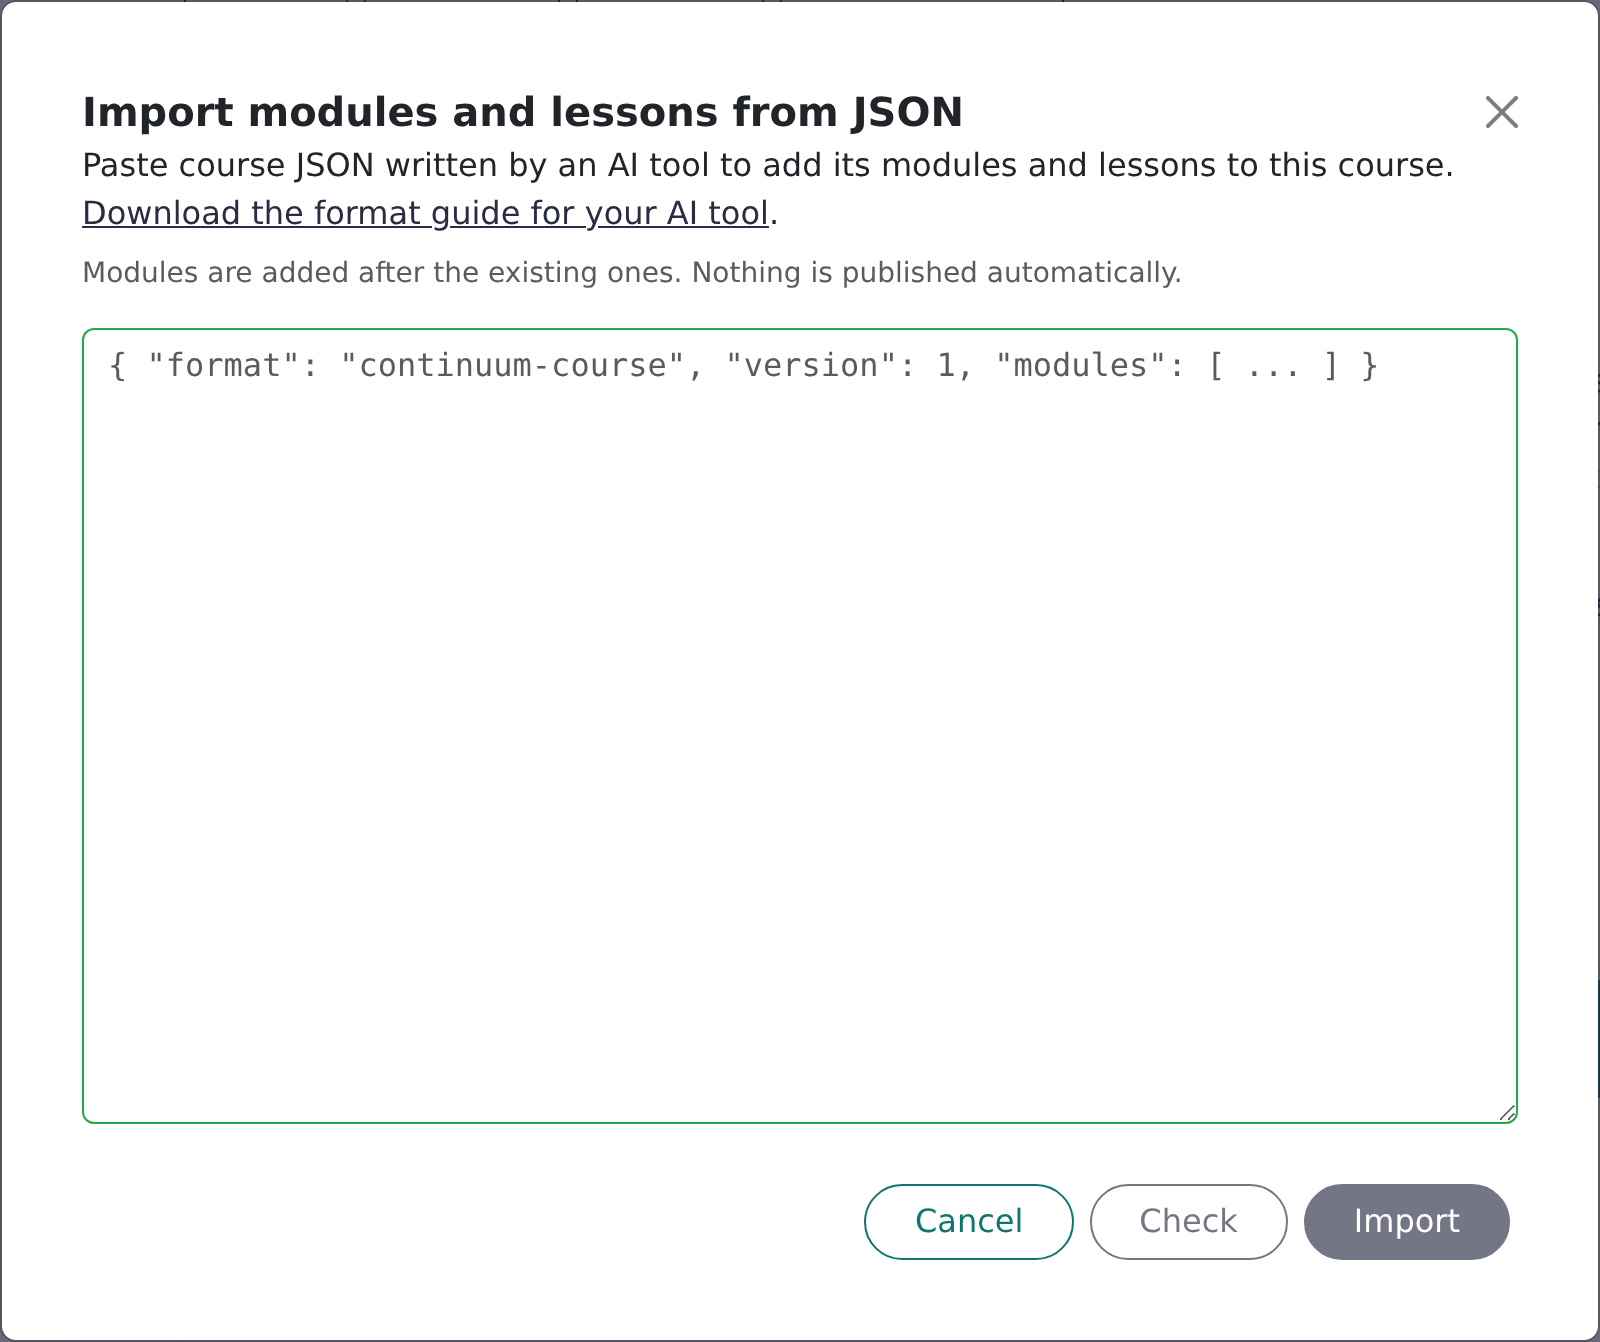
New modules are added after any existing ones, and nothing is published automatically. Because the text came from an outside tool, review it just as carefully.
Your team's AI allowance
AI features are metered. Each team gets an included allowance for each billing period, based on its plan, and it resets on your billing date. Trial teams get a smaller, fixed allowance. The exact amount depends on your plan, so ask support if you need to know yours.
People with the owner or billing role can see how much has been used under Manage > Settings > Subscription, in the usage panel, which shows the percentage of the included allowance used.
When the allowance runs out, new AI requests are refused with a message and nothing is lost:
- Courses you already created are untouched.
- Lessons that were still waiting to be written are marked as failed. Once your allowance is back, use Retry Failed.
- If your plan supports it, the owner or billing admin can switch on Pay-as-you-go AI usage on the Subscription page and set a monthly spending ceiling. Further usage is then added to your invoice, up to that ceiling. When the ceiling is reached, AI stops again until it is raised or your billing date passes.
- Otherwise, wait for your billing date or upgrade your plan.
There is also a limit on how fast requests can be sent. If you click AI buttons many times in a minute, you may be asked to wait briefly.
Edit the course afterwards
AI-generated lessons are ordinary lessons. Open any of them from the course page and edit the text, move or delete blocks, change images, add your own components and adjust quizzes exactly as you would on a course you wrote yourself. Generation does not lock anything.
Before you publish, check:
- facts, numbers, dates, names and legal or safety statements;
- that the tone and terminology suit your learners;
- that quiz answers are correct, and that the right answer really is the right one;
- that any images suit your organisation.
Frequently asked questions
Is my uploaded document shared with other customers?
No. It is used only to write your course. For questions about how the AI provider handles data, contact support.
Can I ask for a longer or shorter course?
Not on the first form. Generate modules, then use the AI Assistant chat ("Make the lessons shorter") or add and delete modules and lessons yourself before you generate content.
Why did some lessons fail?
Usually a temporary fault or the allowance running out. Open Why? on the failed count for the reason, then click Retry Failed.
Can I stop it halfway?
You can leave the wizard at any review step without creating anything. Once lesson writing has started it runs in the background. You can edit or delete lessons at any time.