
Still deciding? See what Single Sign-On (SSO) in Continuum Learn can do for your organisation.
Single sign-on (SSO) lets people sign in to your Continuum site with the account they already use at work, such as Microsoft, Google or Okta, instead of a separate password. Two-factor authentication (2FA) adds a six-digit code from an authenticator app to password sign-ins. You can use either, or both.
SSO uses the OpenID Connect (OIDC) standard. You will usually need your IT team for the first half of this guide: they register Continuum with your identity provider and give you three values back.
Who can do this: team admins. Both settings pages sit under Manage > Settings. Every user can set up their own 2FA from their profile, if your team offers it for their role.
Before you start
Ask your IT team for a short meeting. You need:
- someone who can create an "app registration" or "OIDC client" in your identity provider;
- to decide whether people not yet in Continuum should get an account automatically when they first sign in (see Accounts that don't exist yet);
- a spare admin account that can still sign in with a password, in case something is wrong with the connection.
Which identity providers work
Continuum connects to any provider that supports OpenID Connect with a standard discovery address. That includes Microsoft Entra ID (Azure AD), Google Workspace, Okta, Auth0, Keycloak and most others. There are no provider-specific presets: every provider is set up through the same form. Your provider must publish its settings at its issuer URL followed by /.well-known/openid-configuration, and the issuer URL must start with https://.
Each team connects one identity provider.
Connect your identity provider
- Go to Manage > Settings > Single Sign-On.
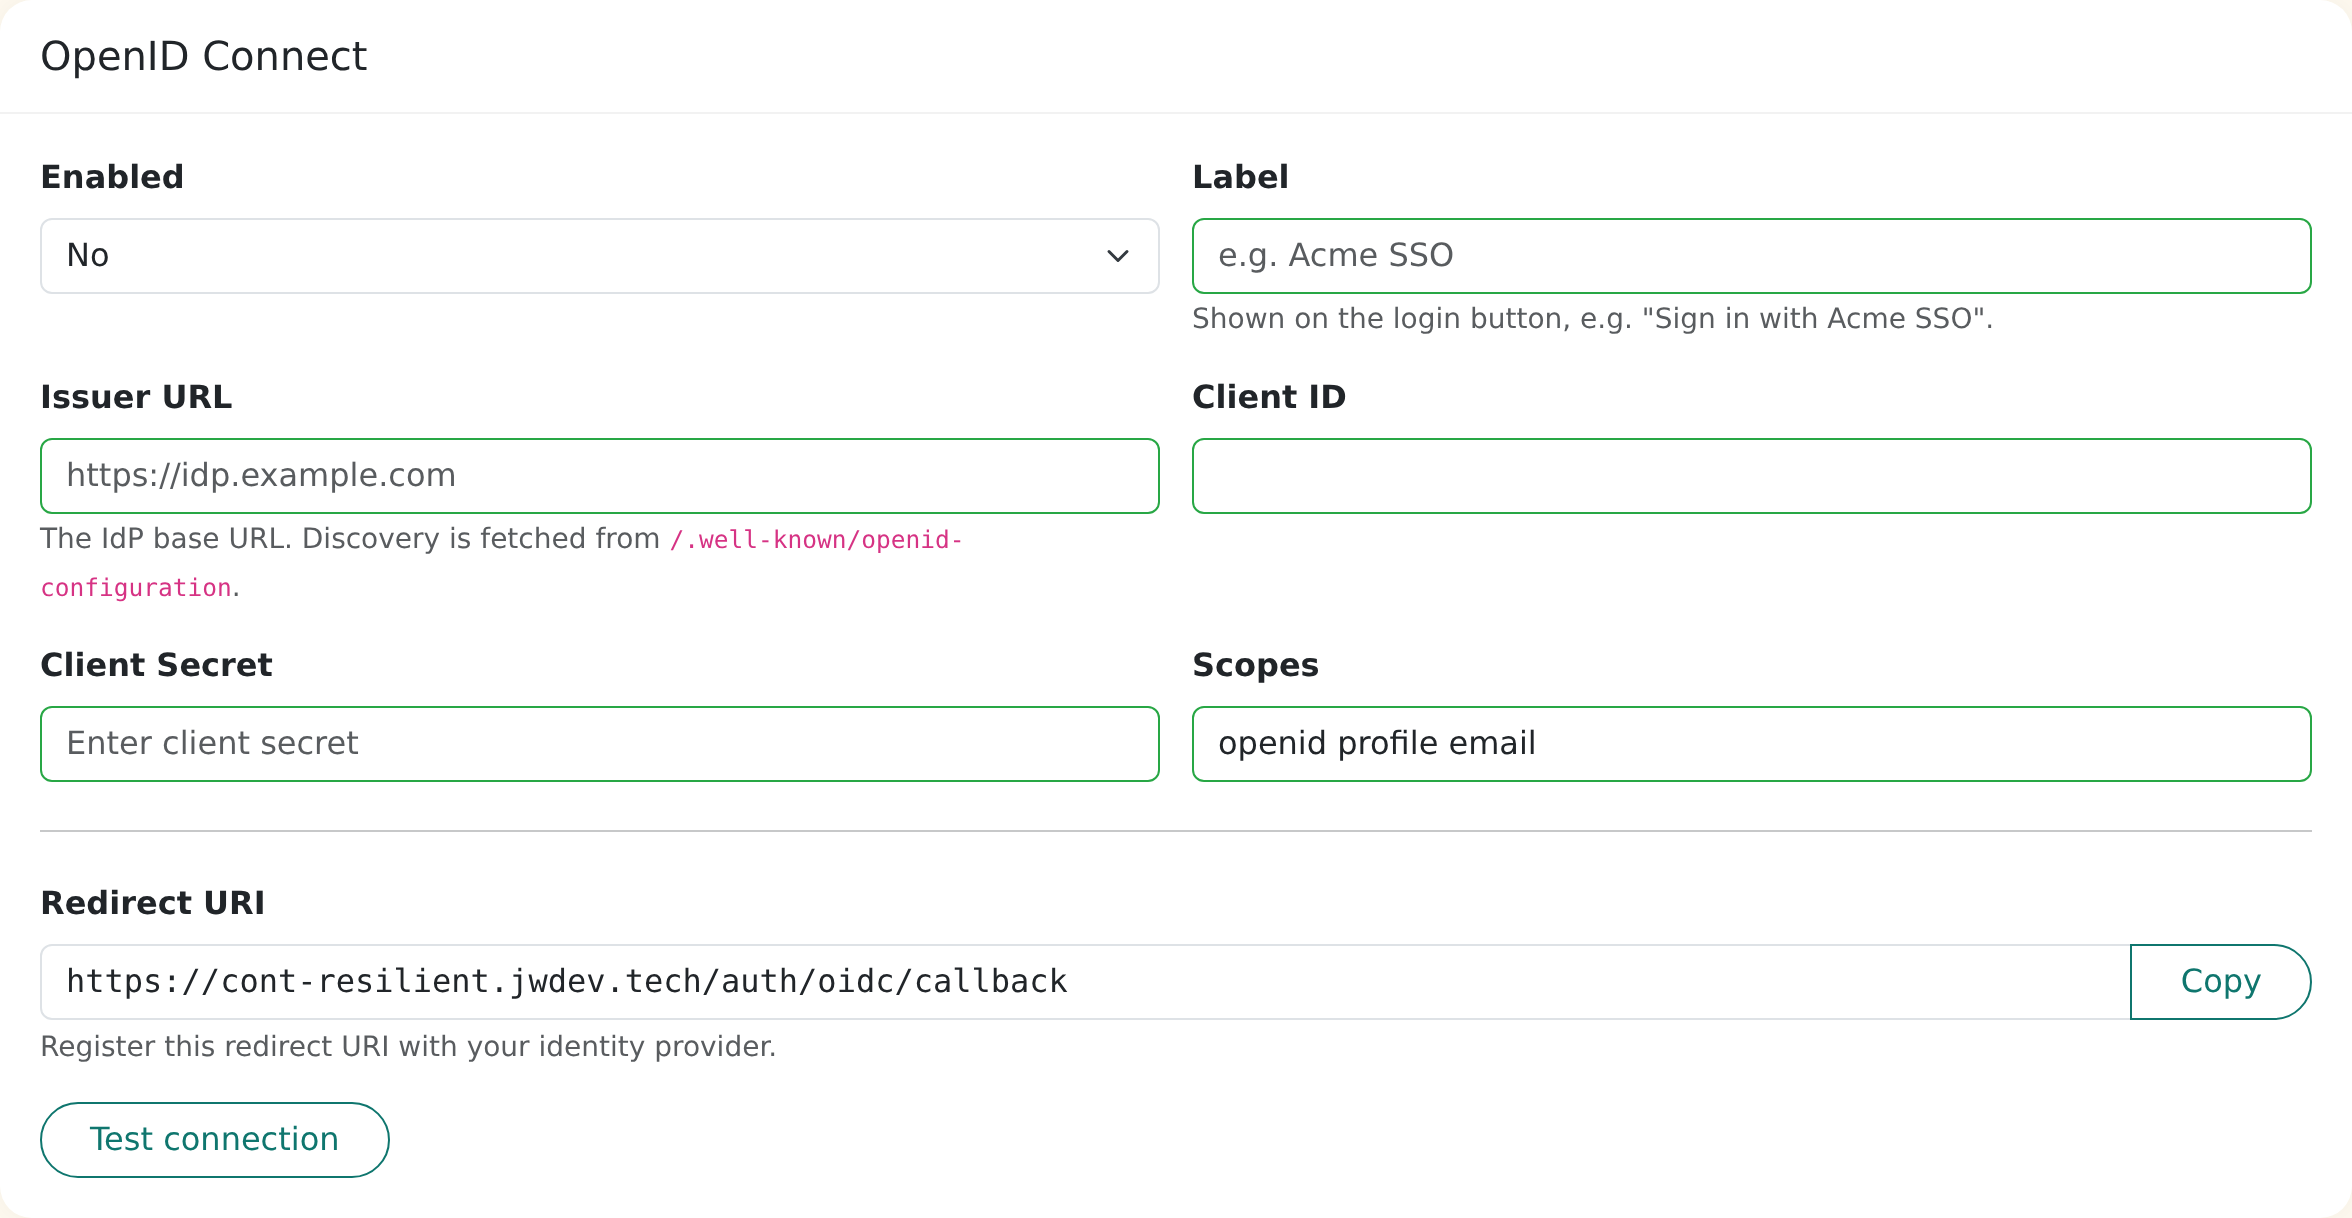
- In the OpenID Connect card, find the Redirect URI. Click Copy and send it to your IT team. They must register it with your identity provider exactly as shown. The same redirect URI is used whichever address your learners sign in from.
- Ask your IT team for the Issuer URL, Client ID and Client Secret from the app registration they created.
- Fill in the form:
| Field | What to enter |
|---|---|
| Enabled | Yes to show the sign-in button on your login page. |
| Label | The name on the button. "Acme SSO" gives Sign in with Acme SSO. If you leave it blank the button says Sign in with Single Sign-On. |
| Issuer URL | The base address of your identity provider, for example https://idp.example.com. Must start with https://. |
| Client ID | From the app registration. |
| Client Secret | From the app registration. Once saved it is never shown again; the box says Configured. Type a new value only to replace it. |
| Scopes | Leave as openid profile email unless your IT team says otherwise. Must include openid. |
- Click Test connection before you save (see below).
- Click Save Changes.
What your IT team needs from you
| They need | Where it comes from |
|---|---|
| Redirect URI (also called callback or reply URL) | The Redirect URI box on the SSO page. |
| Scopes | openid, profile and email. |
| Grant type | Authorisation code flow. Continuum is a confidential client, so it uses a client secret. |
| Email claim | The identity provider must send each person's email. Without an email, sign-in is refused. |
Test the connection
Click Test connection. Continuum runs these checks without anyone needing to sign in. It uses what is typed in the form, so you can test before you save. If you leave Client Secret blank, it uses the saved one.
- Discovery document. It fetches your provider's discovery document.
- Issuer matches. The issuer in that document must match the Issuer URL you typed, and the endpoints must be
https://. - Token endpoint. It confirms the provider's token endpoint.
- Client ID and secret. It sends your credentials to the token endpoint with a deliberately fake sign-in code. The provider rejects the fake code, but the way it rejects it shows whether it accepted your Client ID and secret.
- Redirect URI. If the provider objects to the redirect URI, the test says so.
Each check shows Passed, Failed, Not confirmed or Skipped, with a Fix line for anything that needs attention.
- Could not reach the issuer URL. The address is wrong or not public.
- Discovery document not found (HTTP 404). The address is not the issuer. Remove any trailing path and try again.
- Discovery document rejected: … The provider's settings don't match the address you typed, or an endpoint isn't
https://. - Client ID or secret rejected by the provider. Copy the Client ID again and create a new client secret in your identity provider. Paste it into Client Secret, then test again.
- This app is not allowed to use the authorisation code flow. Enable the authorisation code grant for the application at your provider.
- The provider does not recognise the redirect URI. Register the Redirect URI from the SSO page exactly as shown.
- Not confirmed. The provider gave an unexpected answer, which Continuum shows word for word. The credentials could not be checked, so sign in once as a real user.
- Skipped. The Client ID or secret is empty.
A pass is strong evidence but not a guarantee. Some providers only check the redirect URI during a real sign-in, so the test reminds you to register it. Sign in once as a real user before you announce the change.
Tip: if you change the Issuer URL later, every account link made under the old one is removed. People will need to link again on their next sign-in.
Accounts that don't exist yet
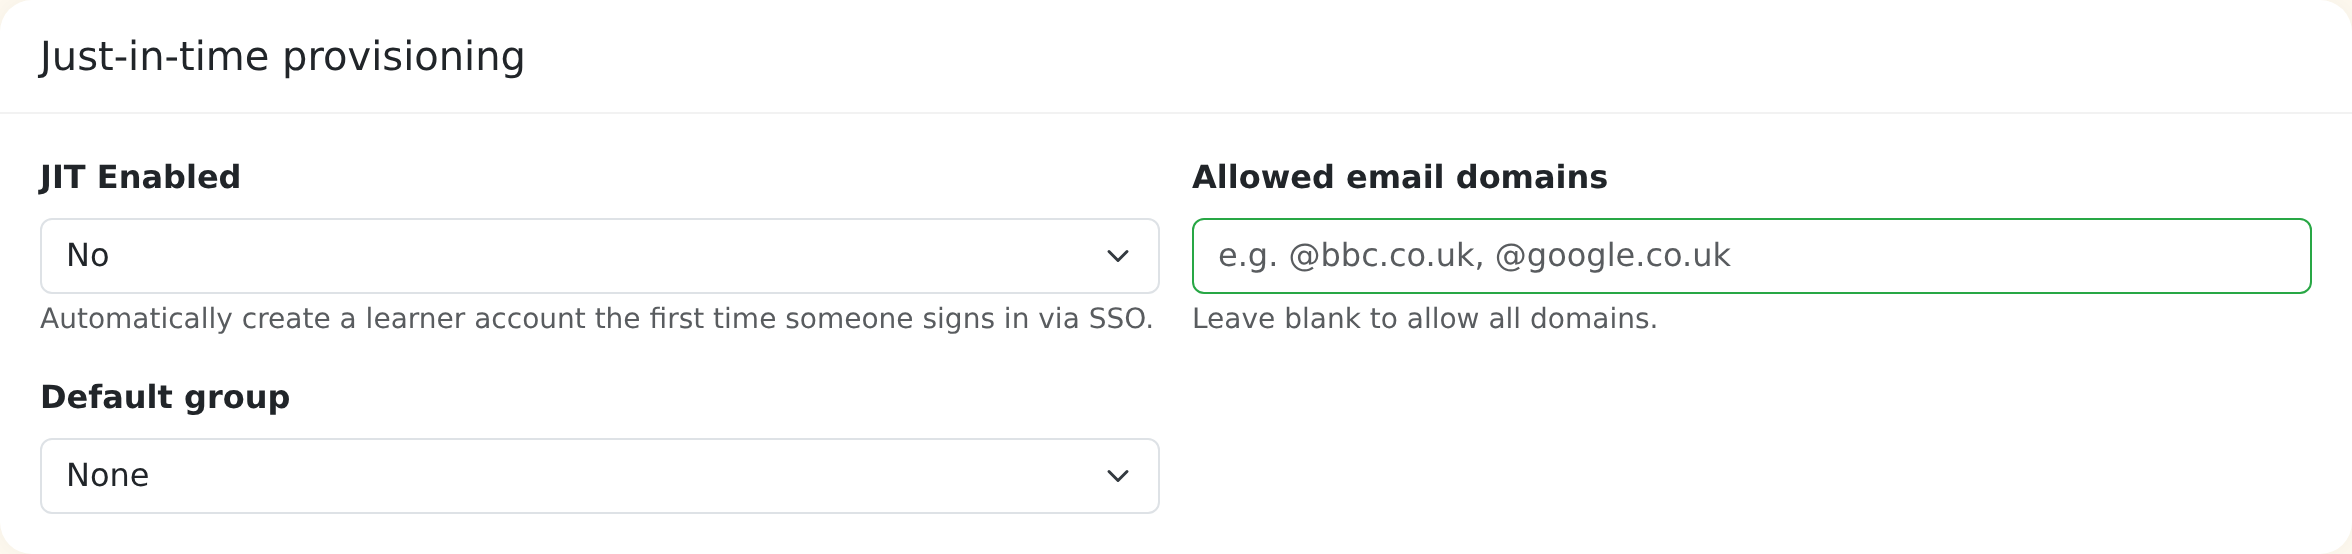
Under Just-in-time provisioning:
| Field | What it does |
|---|---|
| JIT Enabled | Yes creates a learner account the first time someone signs in through SSO. No only lets existing members of your team sign in. |
| Allowed email domains | A comma-separated list such as @acme.co.uk, @acme.com. Leave blank to allow every domain. Email addresses you have pre-approved for your team are also let through. |
| Default group | Group that new people are added to automatically. |
A new account is a learner. Your team's automatic group rules still apply. If the identity provider says the email is verified, Continuum treats it as verified. People refused by these rules see: "Your account is not permitted to sign in to this team. Contact your administrator."
People who already have an account
Continuum matches the email address the identity provider sends against your existing users. What happens next depends on the account:
- Already linked. After the first sign-in, Continuum recognises the person by the provider's own ID, not their email. Changing someone's email at the provider doesn't create a second account.
- An account nobody has used yet. If someone was imported or invited, never signed in, belongs only to your team and is only a learner, they are linked automatically.
- Everyone else, including all admins and authors. The person is sent back to the sign-in page and must enter their existing Continuum password once, in the same browser, to prove the account is theirs. This stops anyone taking over an account just because an email matches. They have 10 minutes to do so; after that they start again.
Platform-level administrator accounts can never sign in through a team's SSO.
Require SSO for everyone
Under Enforcement:
| Field | What it does |
|---|---|
| Require SSO for sign-in | Yes means people must use SSO. The email and password form is hidden for them. |
| Allow admins to use password sign-in | Yes (the default) keeps passwords working for admins, authors and owners, so a faulty connection cannot lock you out. |

Leave Require SSO for sign-in on No while you test. The login page then shows the Sign in with button and, below it, the email and password form.
When it is required, learners only see the SSO button and a Use password instead link. If they try a password, they get "Please sign in using your organisation's single sign-on." The same rule applies to password resets, so nobody can get round it.
Signing in from a custom domain
SSO works on your Continuum address and on your own domain. Nothing extra to set up: the redirect URI is the same. The person starts on your site, goes to the identity provider and returns signed in to the same site. They must finish signing in in the same browser they started in.
Two-factor authentication
2FA is configured per role on Manage > Settings > General, in the Two-Factor Authentication card. For each role choose:
| Mode | Meaning |
|---|---|
| Disabled | 2FA isn't available to people with only that role. |
| Offered | People can switch it on from their profile. |
| Enforced | People must set it up before they can use the platform. |
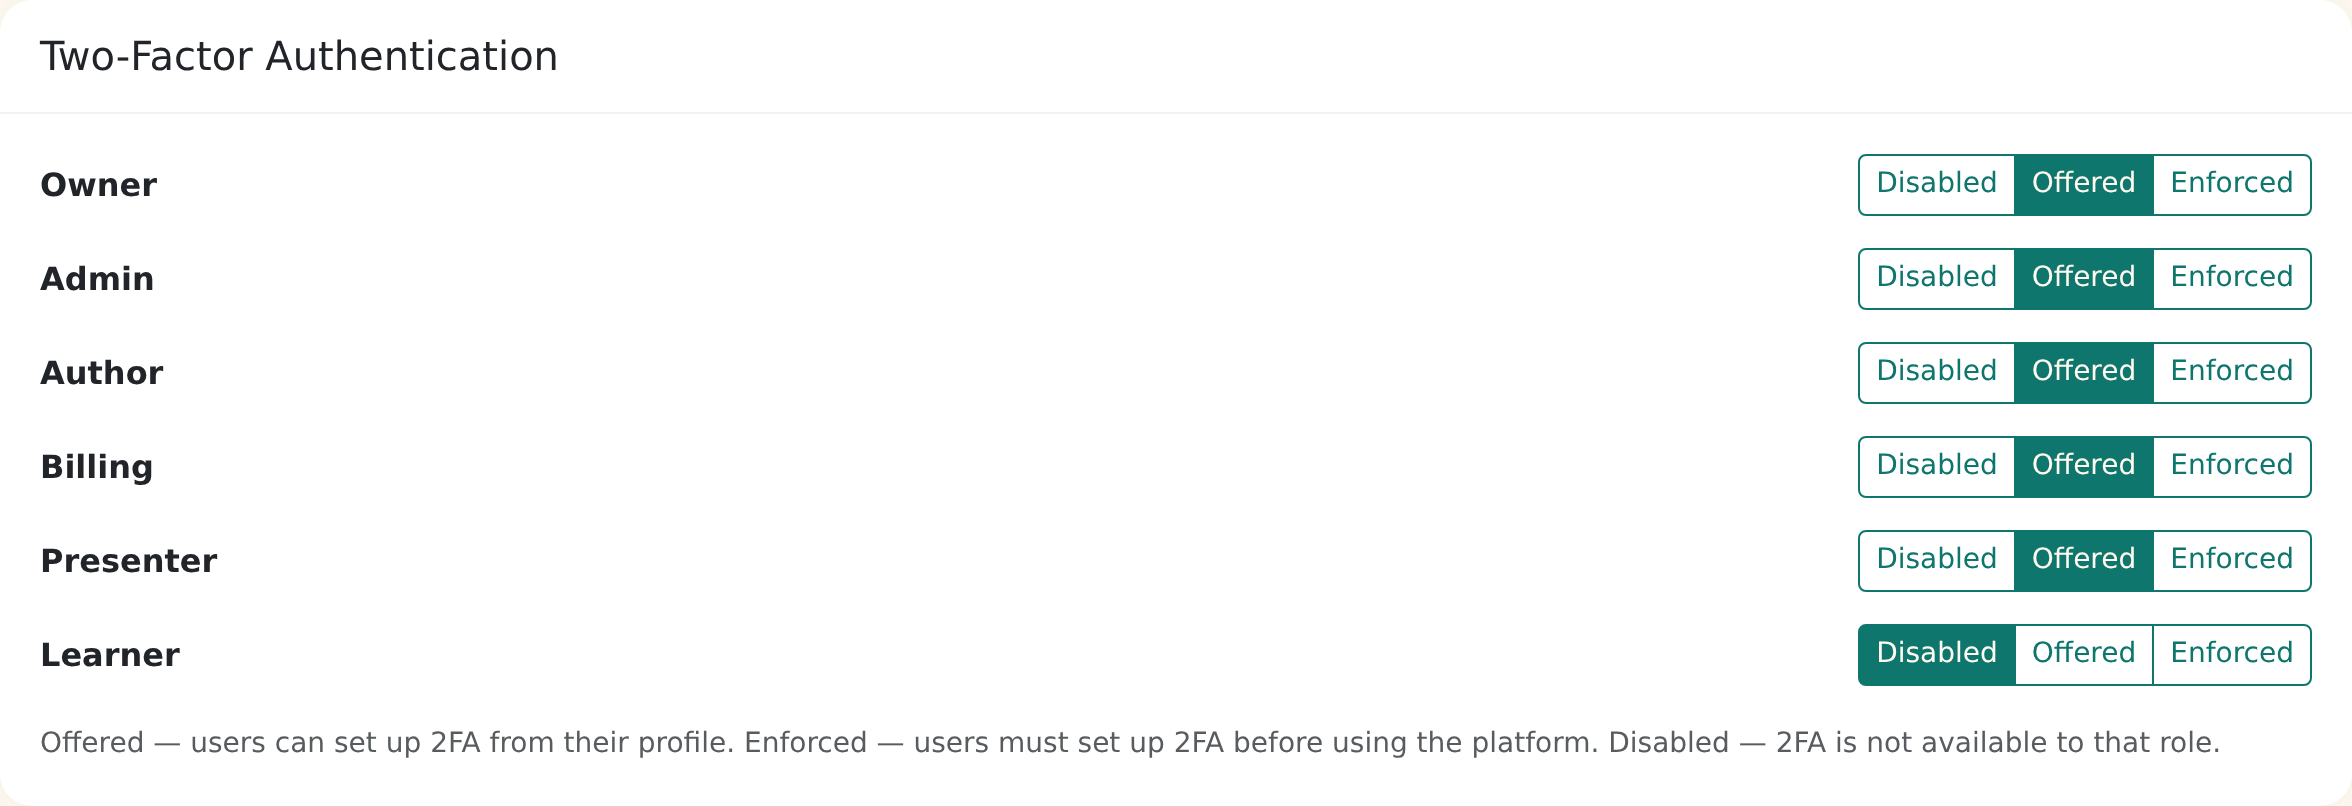
The roles are Owner, Admin, Author, Billing, Presenter and Learner. By default every role is Offered except Learner, which is Disabled. A person with several roles gets the strictest setting of any of them. Platform super admins are not forced to enrol.
Remember to click Save Changes at the bottom of the General page.
An enforced person who hasn't set it up yet is sent to their profile with the message "Your team requires two-factor authentication for your account. Please enable it to continue." until they finish.
Setting up 2FA (for users)
- Open your profile and find Two-Factor Authentication.
- Click Enable two-factor authentication.
- Scan the QR code with an authenticator app such as Google Authenticator or Authy. If you can't scan, type the key shown under the code.
- Enter the 6-digit code and click Confirm.
- Download recovery codes and keep them somewhere safe. Each code works once.
From then on, signing in with a password asks for a code after the password. To use a recovery code, choose Use a recovery code instead. Users can create fresh recovery codes with Regenerate recovery codes, or turn 2FA off with Disable, both after confirming their password.
SSO and 2FA together
2FA applies to password sign-ins. When someone signs in through SSO, your identity provider is responsible for any extra checks, such as Microsoft or Google multi-factor authentication, so Continuum does not ask for a code again. If a role is Enforced, people still have to enrol on their profile before using the management and learning areas, even if they sign in with SSO.
If someone loses their phone
Admins can't currently reset another person's 2FA. If they have a recovery code, they can sign in with it and then regenerate their codes or disable 2FA. If they don't, contact support and we will reset it for them.
Troubleshooting
| What you see | Likely cause and fix |
|---|---|
| The identity provider says "redirect URI mismatch" (or similar) | The Redirect URI registered with the provider isn't exactly the one on the SSO page. Copy it again; check for trailing slashes. |
| Could not reach the issuer URL. | Typo, or the address isn't reachable from the internet. |
| Discovery document not found (HTTP 404). | The Issuer URL isn't the provider's base address. |
| Client ID or secret rejected by the provider. (Test connection) | The Client ID is wrong, or the secret is wrong or has expired. Create a new secret at your provider and paste it in. |
| This app is not allowed to use the authorisation code flow. (Test connection) | The application at your provider doesn't allow the authorisation code grant. Enable it. |
| The provider does not recognise the redirect URI. (Test connection) | Register the Redirect URI from the SSO page with your provider, exactly as shown. |
| Sign-in failed. Please try again. | Usually a wrong Client ID or Client Secret, or an expired secret. Ask IT to check the app registration, then enter the secret again. |
| Sign-in was cancelled or failed at the identity provider. | The person cancelled, or the provider refused them (for example they aren't assigned to the app). |
| This sign-in link has expired or was already used. | The sign-in took too long, or the back button was used. Start again from the login page. |
| This sign-in must be completed in the browser where it was started. | They began on one browser or device and finished on another. |
| Your account is not permitted to sign in to this team. | JIT is off, their email domain isn't allowed, they have no email at the provider, or it's a platform administrator account. |
| Please sign in using your organisation's single sign-on. | Require SSO for sign-in is on and this person isn't exempt. |
| Single sign-on is not available for this team. | Enabled is set to No, or the connection isn't saved. |
| There's no SSO button on the login page | Enabled is No, or no provider is saved yet. |
Frequently asked questions
Do you support SAML?
No. Continuum supports OpenID Connect only. Most providers, including Entra ID, Google Workspace and Okta, offer OIDC alongside SAML. If your organisation can only issue SAML, contact support and tell us which provider you use.
Can I keep a password login for myself?
Yes. Leave Allow admins to use password sign-in on Yes. Admins, authors and owners can then still sign in with a password. Use Use password instead on the login page.
Will existing learners lose their progress when we switch on SSO?
No. Existing accounts are matched by email and keep their courses and results. People who have used their account before confirm once with their existing password, as described above.
Can we use more than one identity provider?
Not at the moment. Each team has one.
Does Learner 2FA work?
Yes, if you set Learner to Offered or Enforced. Learners then see the same section on their profile. Learners are Disabled by default.
What is the "WordPress sign-in secret" on the Integrations page?
That is separate (it used to be labelled "SSO Secret"). It signs the sign-in links from a connected WordPress or membership site and isn't affected by anything on this page. See How to connect WordPress.