
Continuum has two ways to organise people, and they do different jobs. A group is a standing set of people that you can assign courses to. A cohort is a saved list of people, worked out from rules, that you can send notifications to or download.
If you want people to get something (a course, a price, a restricted catalogue), use a group. If you want to find or contact people, use a cohort.
Who can do this: team admins, under Manage > People > Groups and Manage > People > Cohorts.
Groups and cohorts at a glance
| Group | Cohort | |
|---|---|---|
| What it is | A set of people you keep up to date | A saved list of people, recalculated from your rules every time you use it |
| How people get in | You add them, or (optionally) profile-field rules add and remove them | Only by matching the rules. You can't add or remove individuals |
| Assign courses to it | Yes. Members are enrolled in the group's courses | No |
| Affects what members see in the catalogue | Yes, with the group settings below | No |
| Custom prices for courses | Yes | No |
| Filter reports by it | Yes, on the course reports | No |
| Send a notification to it | No | Yes, under Manage > Notifications |
| Download its people | No | Yes, as a CSV of names and emails |
| Rules can use learning activity (completed a course, active recently) | No, profile fields only | Yes |
Use a group when a team, department, customer or intake should all get the same courses, or be reported on together.
Use a cohort when you need a list that changes by itself, such as "completed Course A but not Course B" or "active in the last 3 months", to email or export.
A cohort can't enrol anyone, and a group can't be emailed. If you want both, create the cohort for the message and the group for the courses.
Create a group
- Go to Manage > People > Groups and click Add group.
- Enter a Name.
- Optionally set up Auto-Assignment Rules (see below). The rules section only appears if your team has signup fields that are a select, radio or checkbox type with values to choose from.
- Click Save changes.
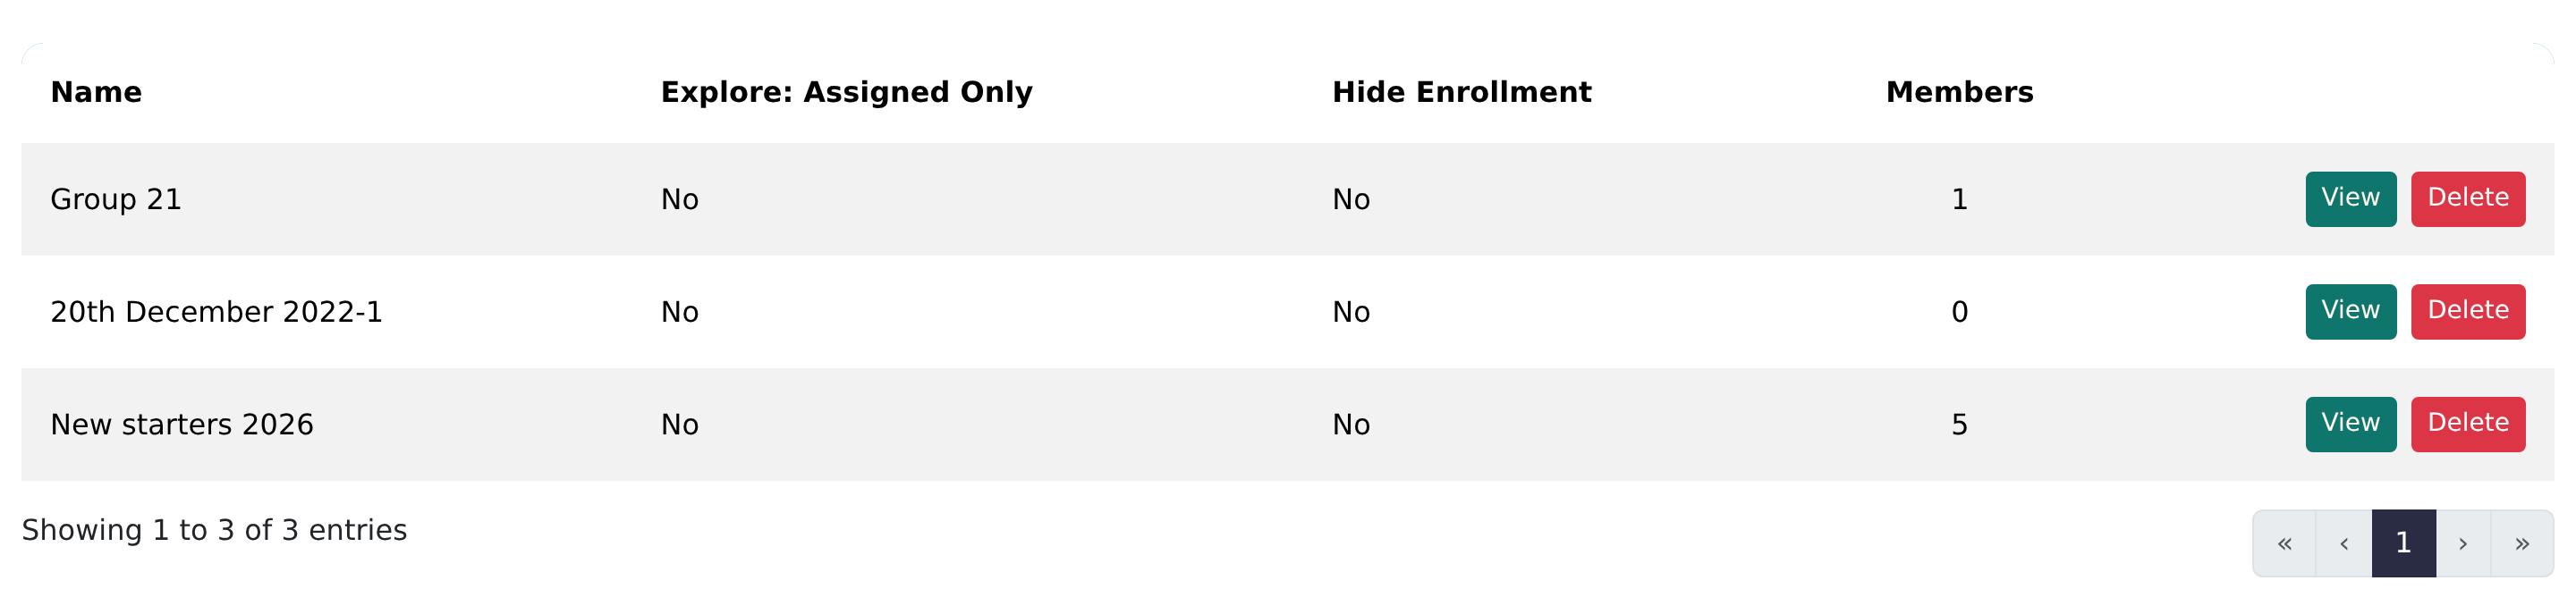
The list shows the Members count and whether the group has Explore: Assigned Only or Hide Enrollment switched on. Click View to open a group. Some groups are marked locked. You can't delete those.
Add and remove members
- Open the group and stay on the Members tab.
- Click Add Members.
- Search by name or email, click people to move them to Selected, or use Add all shown.
- Click Add members.
To take someone out, click Remove next to them on the Members tab. You can also assign groups to a person from Manage > People > Users.
Members of a group with auto-assignment switched on are managed by the rules. See below.
Assign courses to a group
Open the group and go to the Courses tab. It lists every course assigned to the group, with its Enrolment Type.
- Click Assign Courses.
- In the picker, put each course in automatic or optional.
- Click Assign courses.

| Enrolment Type | What happens |
|---|---|
| Automatic | Every member is enrolled. The course appears in their My courses and they can't unenrol themselves from it while they're in the group. |
| Optional | Members aren't enrolled. The course appears in their Explore catalogue so they can choose to enrol. |
Use Set Optional or Set Automatic to switch a course, Remove to take it off the group, and View to open that course's own Groups tab. You can also assign groups from the course side, under Manage > Courses, on the course's Groups tab. Both places change the same thing.
Because enrolment comes through the group, people who join later are enrolled automatically, and people who leave the group lose that route to the course.
Group settings
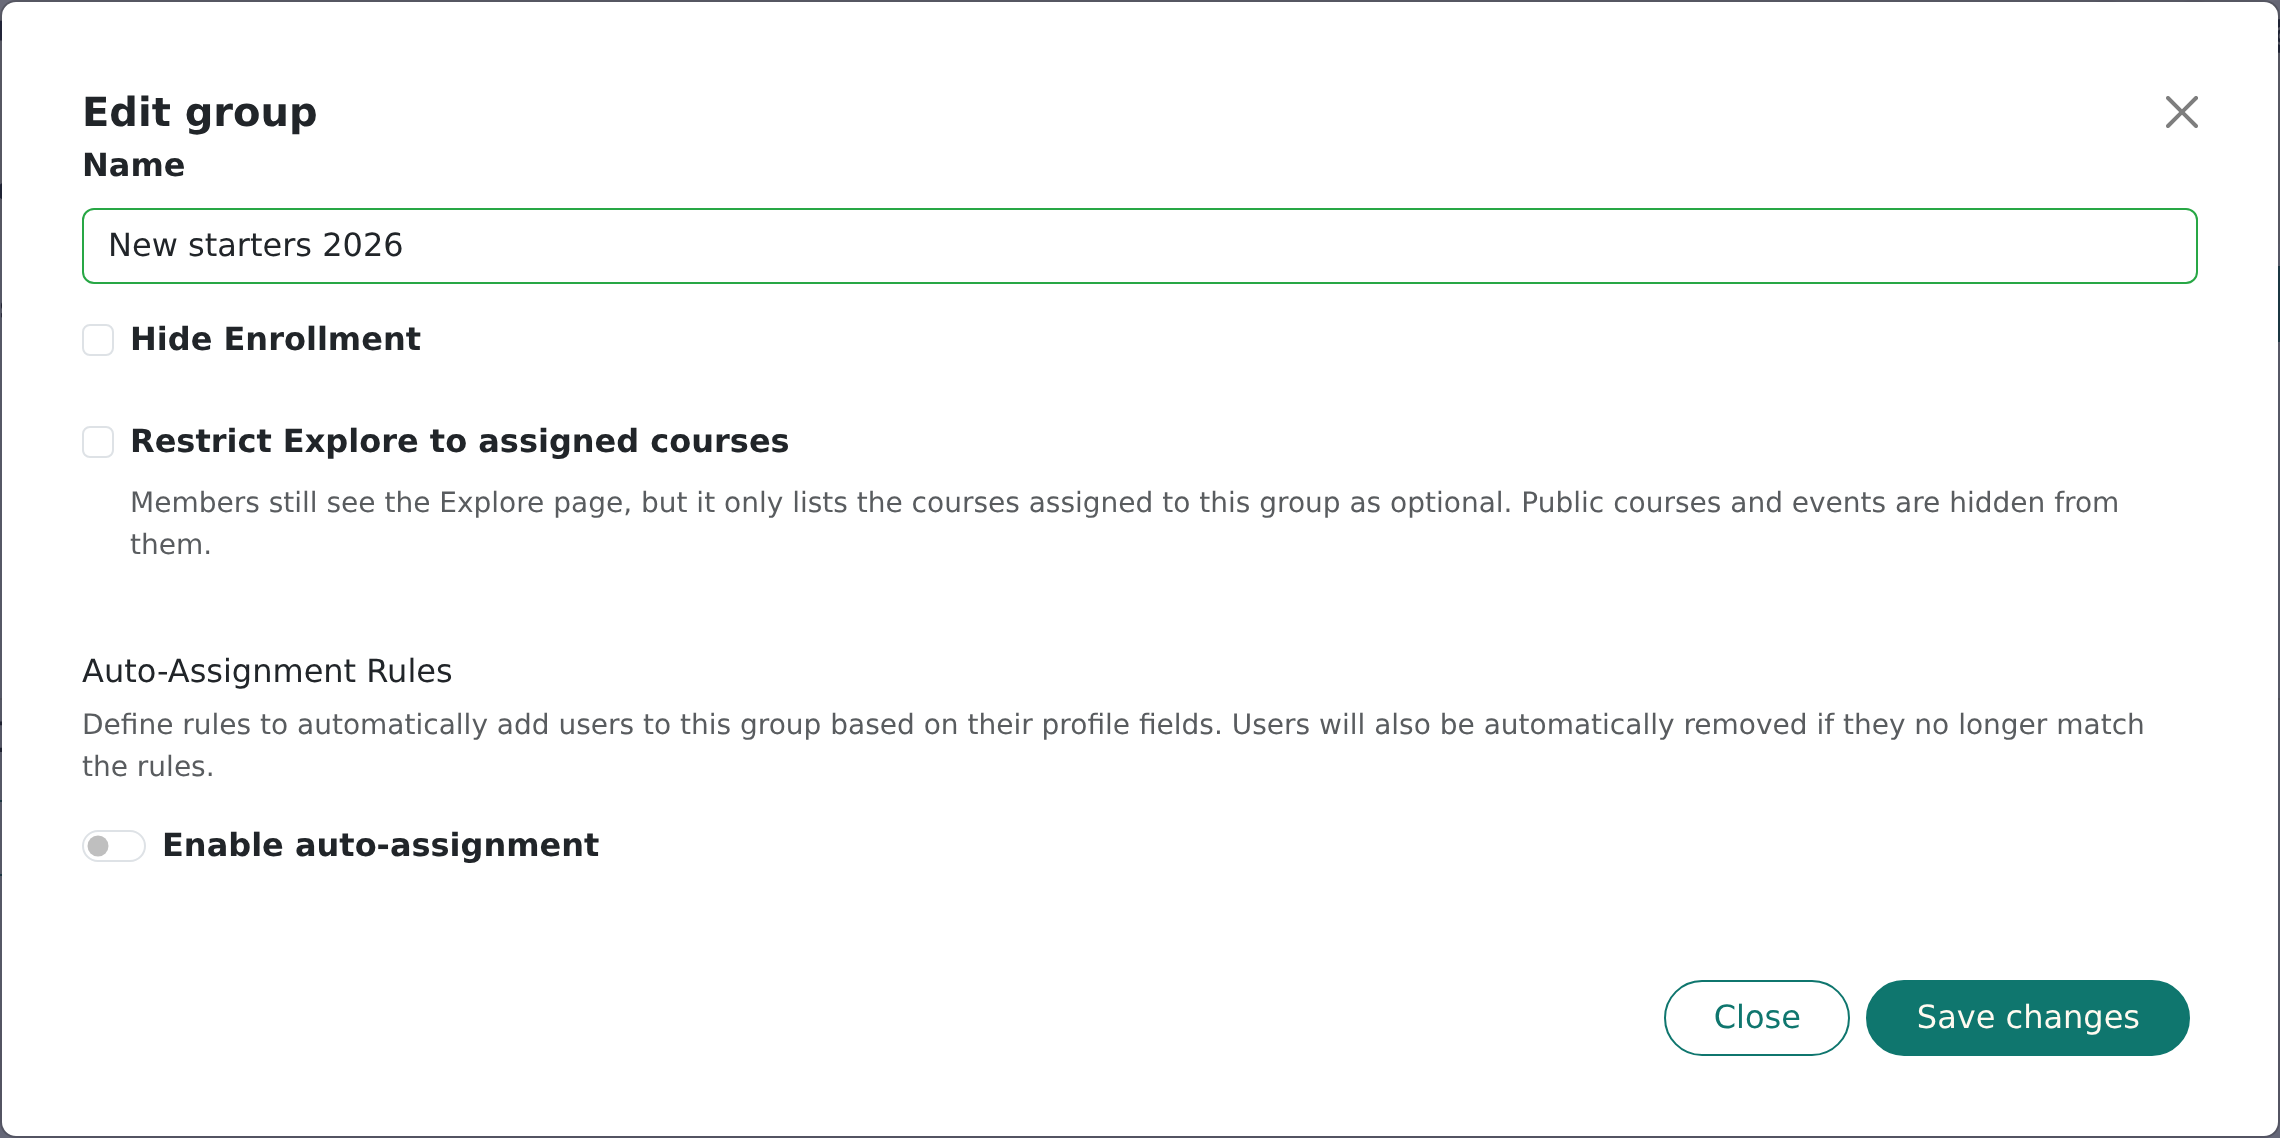
Open a group, click the three-dot menu next to its name and choose Edit.
| Setting | What it does |
|---|---|
| Hide Enrollment | Members don't see the enrol button on courses in Explore. |
| Restrict Explore to assigned courses | Members still see Explore, but only with the courses assigned to their group as optional. Public courses and events are hidden. |
| Enable auto-assignment | Turns on the rules described below. |
If someone belongs to several groups and any one of them has a setting switched on, it applies to that person.
Auto-assignment rules
Rules add people to the group, and remove them again, based on their signup fields.
- In the group's Edit window, switch on Enable auto-assignment.
- Click Add Rule, choose a Field, then choose the Values.
- For more than one value, choose Match any or Match all.
- For more than one rule, join them with AND, OR or AND NOT.
- Check the plain-English Result line, then click Save changes.
Continuum applies the rules when you save the group, when someone's signup details change, and when they sign in through single sign-on. People who no longer match are removed.
Course pricing
If you sell courses, the Edit window also has a Course Pricing section (it appears when your team has paid courses). Choose a course and set a Group Price. Use 0 for free access. Members see the group price instead of the normal price.
Reporting by group
On a course, open Manage > Courses, choose the course and go to Reporting. Choose a Group to narrow the report to its members, or pick Completion by Group to compare groups side by side. The main reports under Manage > Reporting also have a group filter, and downloads are named after the group you chose.
Create and use a cohort
A cohort is a list defined by filters.
- Go to Manage > People > Cohorts and click Create Cohort.
- Enter a Cohort Name.
- Click Add Filter and choose a Type. The first filter is labelled Start with.
- For each further filter, choose AND, OR or AND NOT to say how it combines with the ones above.
- Check the Result line, then click Create.

| Filter type | Finds |
|---|---|
| All Users | Everyone in the team |
| Active Users (last 3 / 6 / 12 months) | People who have been active in that period |
| Course Completed | People who completed the courses you choose, optionally within a Time Period |
| Event Attended (on the day) | People who attended the events you choose, optionally within a Time Period |
| Enrollment (courses & events) | People enrolled in the courses or events you choose, optionally within a Time Period |
| Broadcast Access (live events & VOD) | People with access to the broadcasts you choose |
| Email List | People whose emails are on a text file you upload (one per line) |
| User Membership Status | People whose membership status matches the text you enter |
Where you pick several courses or broadcasts, you can choose Match any or Match all.
The User Count is recalculated whenever the list is shown, so cohorts stay current as people complete courses. They aren't snapshots.
What you can do with a cohort
- Download gives you a CSV with each person's name and email. If nobody matches at that moment, you get a short "no users found" message instead of a file.
- Send a notification. Under Manage > Notifications, choose the cohort in Select Cohort or leave blank. You can pick a course, a cohort or both, and recipients are everyone in whatever you choose.
- Edit or Delete a cohort from the list. Locked cohorts can't be changed.
Programme intakes are not cohorts
On a programme's Learners tab you can type an Intake label (up to 100 characters) when you enrol someone or import a CSV, for example "January 2027". It's just text you can use to tell groups of starters apart. Learners see it on their dashboard, and it appears in the Intake column of the programme's learner list and its report CSV.
An intake doesn't link to the lists under Manage > People > Cohorts, and it doesn't enrol anyone in anything. (Before November 2026 this field was also labelled Cohort.) See the programmes guide.
Frequently asked questions
Can I email a group?
Not directly. Groups don't appear in the notification audience list. Create a cohort that finds the same people, for example by Enrollment in the course the group is assigned, and send the notification to that.
I added someone to a group but they can't see the course. Why?
Check the Enrolment Type on the group's Courses tab. Optional courses appear in Explore and need the learner to enrol. Only Automatic courses enrol them. Also check that the group has Restrict Explore to assigned courses on, which hides everything except its assigned optional courses.
Why can't I add people to a cohort?
Cohorts are calculated from rules, so people can't be added by hand. To include specific people, upload them as an Email List filter, or use a group.
Why did someone disappear from a group?
If Enable auto-assignment is on, the rules control membership, and people who stop matching are removed. Check the rules in the group's Edit window.
What happens to learners' progress when I remove a course from a group, or someone leaves?
They lose the group as a route into the course. Check the course's own Groups tab and learner list if you need to see who is still enrolled another way.
Can a person be in more than one group?
Yes. They're enrolled in the courses from all their groups, and any group's settings (such as Hide Enrollment) apply to them.