
In short
In Continuum Learn, the Website embeds generator gives you a short snippet to paste into any website. It shows live course and event cards, buy buttons or a whole publication, with no developer needed.
Still deciding? See what Website Embeds in Continuum Learn can do for your organisation.
A website embed is a short piece of code that you copy from Continuum and paste into a page on your own website. When someone visits that page, the embed fills itself with live information from your Continuum team.
There are two kinds:
- Advertise your courses. Course cards, event cards and buy buttons. Each card links through to the course, the event or checkout on your Continuum site.
- Show a publication. A whole guide, handbook or fact sheet appears inside your page, with its sidebar and lesson navigation. See How to put a publication on your website.
Embeds work on any website that lets you add a script tag: Wix, Squarespace, Webflow, WordPress, Drupal or a hand-built page. Not sure which way to connect your website? See Which way should I connect Continuum to my website?
Who can do this: team admins. You also need to be able to edit the page on your website.
Before you start
- Only public courses appear in a course embed. Hidden, draft and members-only courses don't.
- Only published events appear: live, upcoming, and finished events whose replay is on sale.
- A publication must have embedding turned on before it can be shown. See How to put a publication on your website.
- Visitors don't sign in through an embed. When they enrol or buy, they sign in or register on your Continuum site.
Create an embed
- Go to Settings > Website & API.
- In the Website embeds card, under What do you want to put on your website?, choose Advertise your courses or Show a publication.
- If you are advertising courses, choose a Widget: Course list, Single course, Event list, Single event or Buy button.
- Set the options. The Preview updates as you go. It uses your live data, exactly as visitors will see it.
- Click Copy under Embed code.
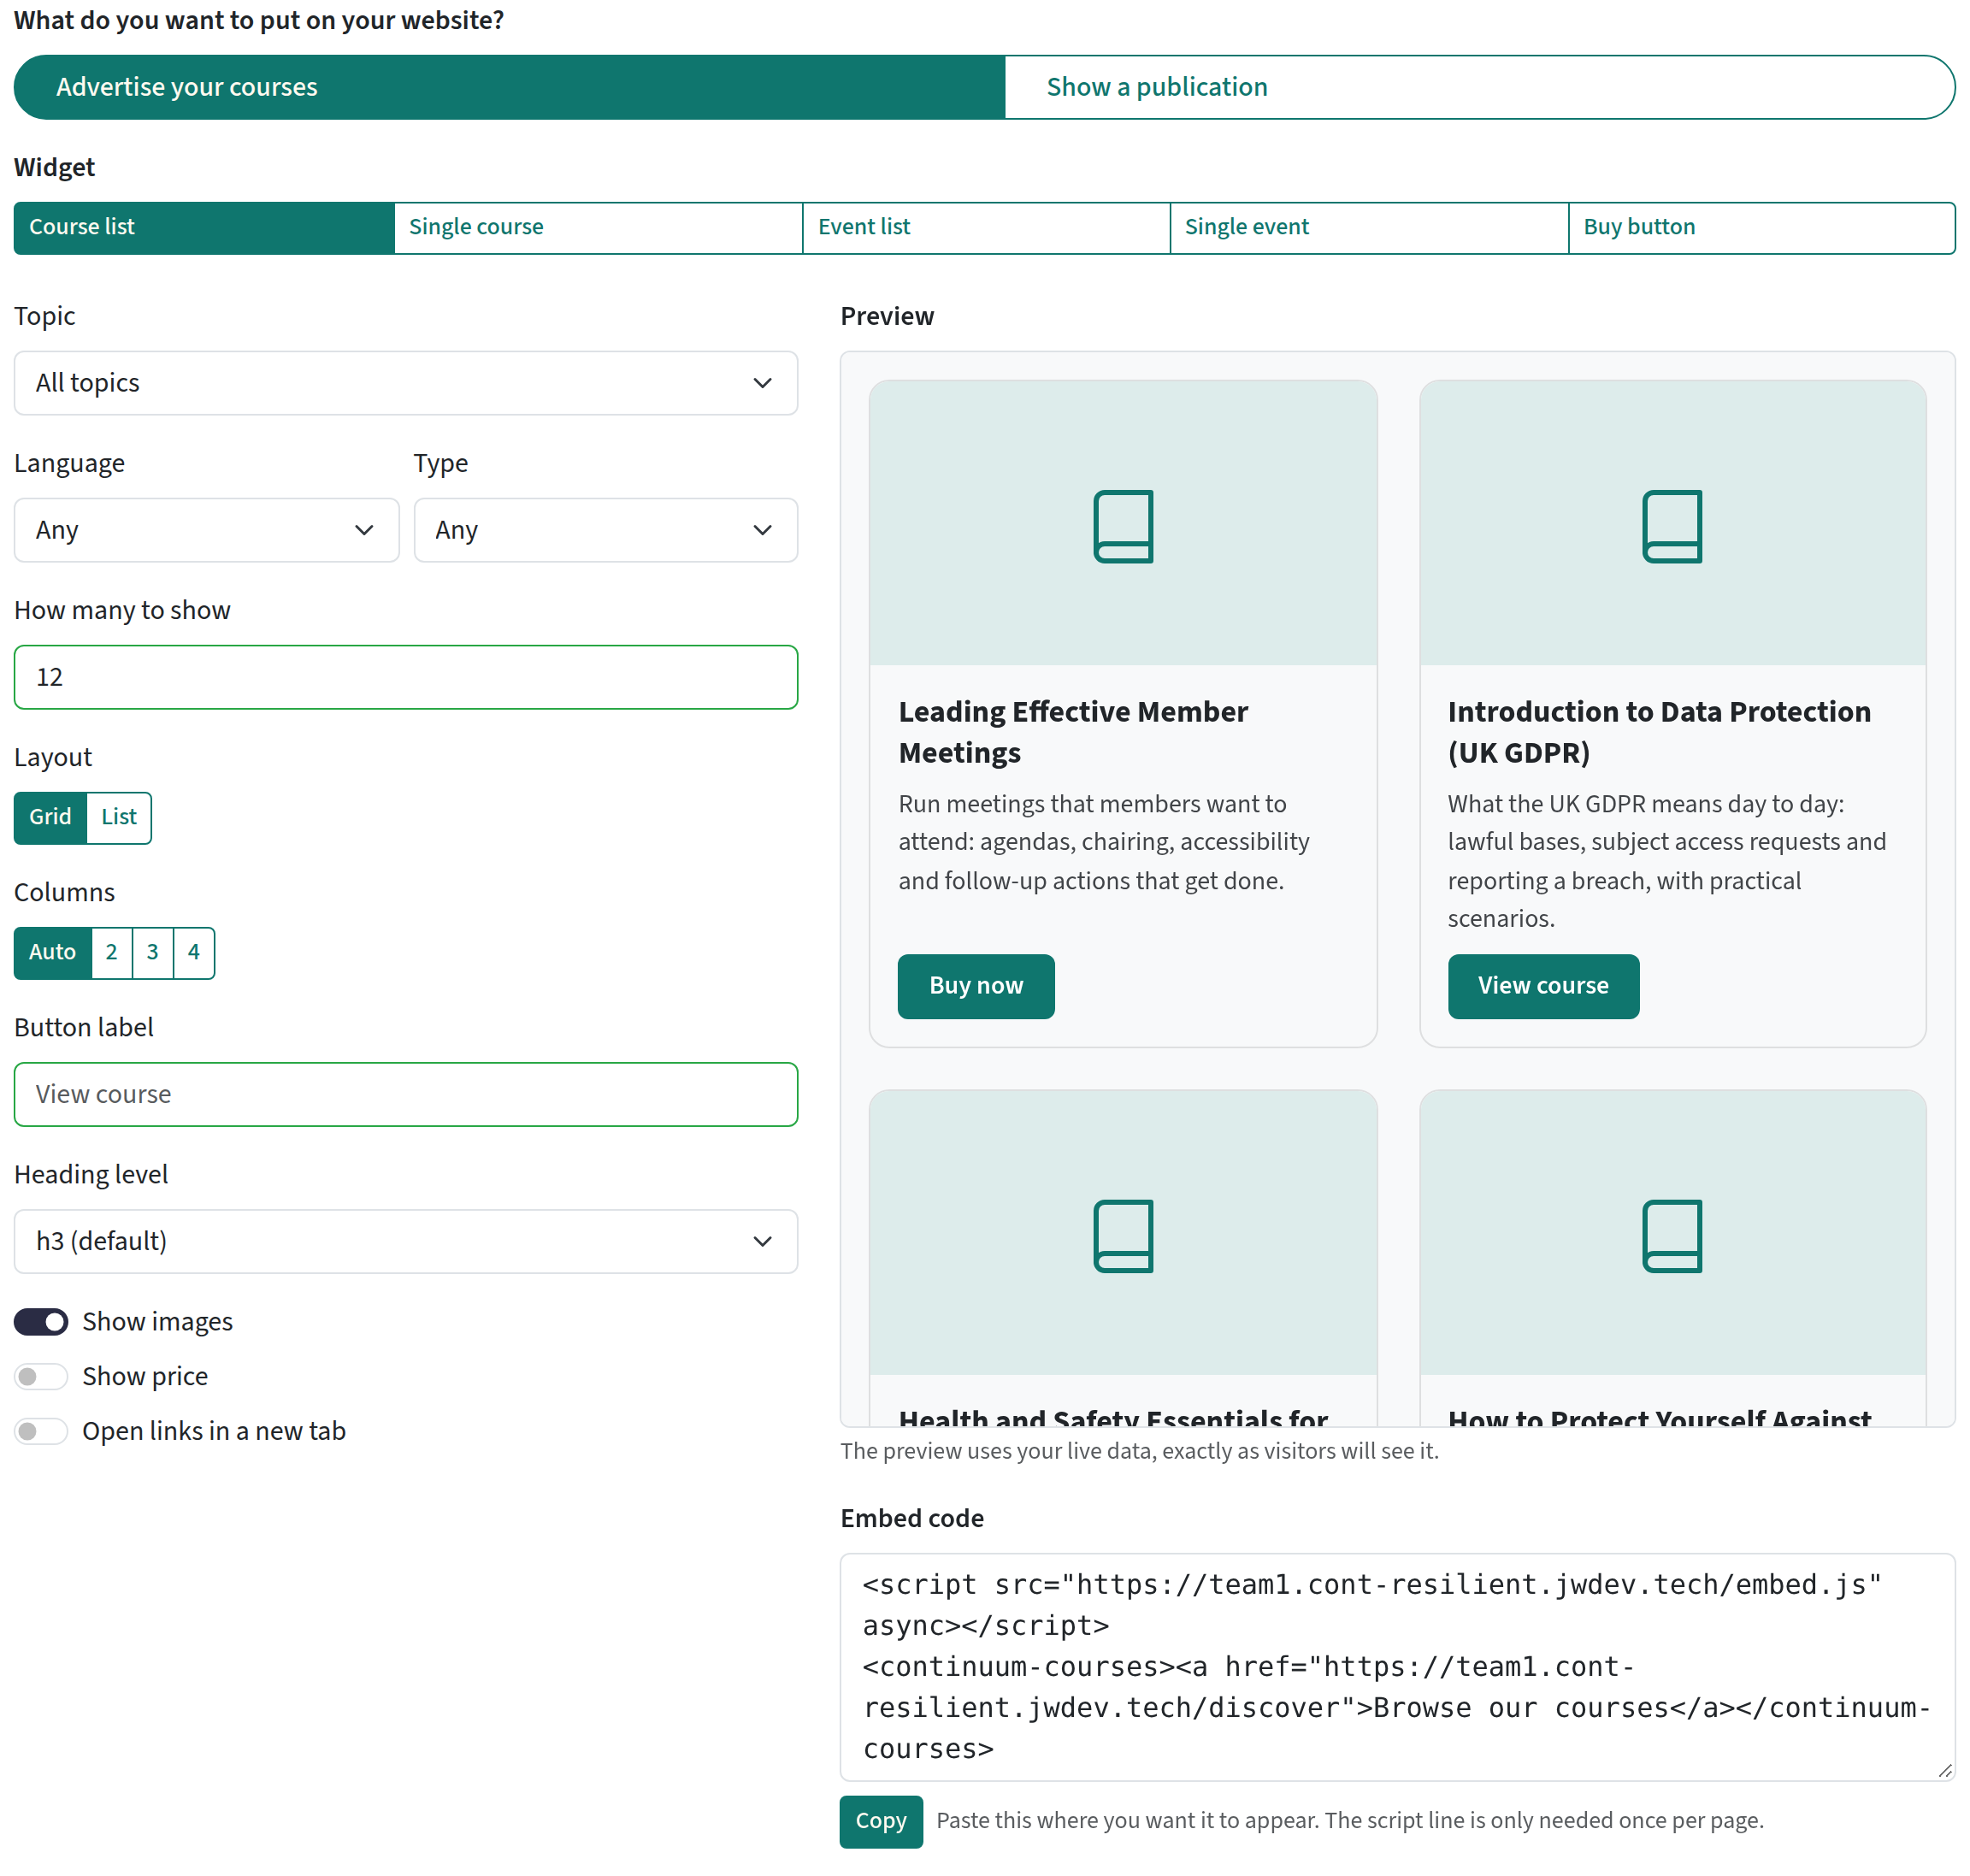
The options
| Option | What it does |
|---|---|
| Topic | Show only the courses in one topic. |
| Language | Show only courses in one language, with a translation into it, or with no language set. |
| Type | Show only courses, only scheduled courses or only publications. |
| How many to show | Up to 50. The default is 12. |
| Layout | Grid or List. |
| Columns | For a grid: Auto, or 2, 3 or 4 columns. Columns drop on narrow screens. |
| Button label | Your own text for the card button, such as "Book now". |
| Heading level | The heading tag used for card titles (h2 to h6). Match it to your page so the headings stay in order for screen readers. |
| Show images | Turn the course or event image on or off. |
| Show price | Show the price on each card. |
| Open links in a new tab | Opens the course, event or checkout in a new tab. |
| What are they buying? | For a buy button: Course, Bundle or Event ticket. |
| Return URL | For a buy button: the page on your website to send the buyer back to after checkout. |
Paste it into your website
The code has two parts:
<script src="https://yourteam.continuumlearn.com/embed.js" async></script>
<continuum-courses limit="6" show-price><a href="https://yourteam.continuumlearn.com/discover">Browse our courses</a></continuum-courses>
The first line loads the embed. You only need it once per page, even if you add several embeds to the same page. The second line is the embed itself. The link inside it is a fallback that shows if the script can't run.
Always copy the address from the generator. It is your team's own address, or your custom domain if you have one, and it must match the team whose courses you want to show.
Where to paste it:
| Website | Where to paste |
|---|---|
| WordPress | Add a Custom HTML block to the page. |
| Wix | Add an Embed code element (Embed HTML) and paste the code into it. |
| Squarespace | Add a Code block. |
| Webflow | Add an Embed element. |
| Drupal | Use a text format that allows <script> tags, or ask your web team. |
| Hand-built HTML | Paste it where you want the cards to appear. |
Some website builders only allow custom code on certain plans. If yours removes the script, see Troubleshooting.
What each embed shows
| Embed | Shows | Attributes |
|---|---|---|
<continuum-courses> |
A grid or list of public courses | folder, language, type (course, live or publication), limit, layout, columns, show-price, show-image, button-label, heading-level, target, lang |
<continuum-course id="123"> |
One course card | id (required), plus the display attributes above |
<continuum-events> |
Published events, with the next session date, how many sessions and the price | limit, layout, columns, show-price, show-image, button-label, heading-level, target, lang |
<continuum-event id="123"> |
One event card | id (required), plus the display attributes above |
<continuum-buy type="course" id="123"> |
A buy button into checkout | type (course, bundle or broadcast_product for an event ticket), id, event (for an event ticket: the event's id, needed to show the ticket price), label, return-url, show-price, target, lang |
<continuum-publication id="123"> |
A whole publication | id (required), lesson, lang, follow-url |
A few details:
- On a course card, the button goes to checkout (Buy now) when the course is for sale, and to the course page (View course) otherwise. A course buy button does the same: for a course that isn't for sale it becomes a View course link (or your own label).
- Buy buttons always use your team's brand colour.
- An event-ticket buy button shows its price only when the snippet includes the event, as
event="34". Copy the snippet from the generator, which adds it for you. Bundle buy buttons show no price. - A course with no price shows Free. A free event shows no price; a paid event shows its price, or From the lowest price when there are several tickets (Free if the cheapest ticket is free).
target="_blank"opens links in a new tab.- Every link from an embed carries
utm_source=embedandutm_medium=the hostname of the website it was clicked on (for exampleutm_medium=www.example.org.uk), so you can see visits and sales from your site in your analytics.
Allowed websites
By default, any website can show your embeds. To limit them:
- Go to Settings > Website & API.
- Under Allowed websites, type a website address such as
https://www.example.org.ukand click Add. You can add up to 20. - Click Save Changes.
Embeds then load only on the websites in the list. Enter just the address, with no page path. https://example.org.uk and https://www.example.org.uk are different websites, so add both if your site uses both.
Using Wix? Wix runs custom code inside a frame on its own address, not your website's address, so the embed asks for your courses from that Wix address. Add that address to the list as well, or leave the list empty, and test the published page after you save.
To allow any website again, remove every address and save.
The list controls where embeds load. It does not hide anything: your public courses and events are already visible on your Continuum site.

Change how it looks
Cards use your website's font and your team's brand colour (the primary button colour in your theme settings), so they usually look at home without any work.
Each embed draws inside its own isolated box: it won't restyle your page, and your site's styles won't restyle it. To restyle it, your web team can set these CSS custom properties on the embed:
| Property | What it changes |
|---|---|
--continuum-accent |
Button and accent colour |
--continuum-radius |
Card corner radius |
--continuum-font |
Font family |
--continuum-card-bg |
Card background |
For more control, style the named parts with ::part(): card, image, body, title, summary, price, meta, button, grid, empty and buy.
For example, add this to your website's CSS:
continuum-courses {
  --continuum-accent: #1d3557;
  --continuum-radius: 4px;
}
continuum-courses::part(title) {
  font-size: 20px;
}
continuum-courses::part(button) {
  text-transform: uppercase;
}
A publication keeps its own fonts and colours, set in Continuum, so it looks the same on your site as it does in Continuum.
Languages
Button labels and dates are shown in your team's default language. Prices are shown in your portal's selling currency in their usual format, for example £25.00 or $25.00. If your team has more than one language turned on (Settings > Languages), add a lang attribute to show them in another one, for example lang="cy" for Welsh. The supported codes are en, cy, fr, fr-CA, de, es, it, nl and pt. A language your team hasn't turned on falls back to the default.
Dates are formatted by the visitor's browser. If the browser has no date data for a language (Chrome, for example, has none for Welsh), dates appear in British English format instead.
lang changes the labels. To show only the courses in a language, use the language attribute (the Language option in the generator).
Updates and caching
Embeds show your live catalogue. A change you make in Continuum, such as a new course or a new price, can take about five minutes to appear on your website, because the information is cached for speed.
Privacy
Embeds set no cookies and don't track visitors. They only read information that is already public on your Continuum site.
Troubleshooting
| Problem | What to try |
|---|---|
| Nothing shows, or only the fallback link | Check the address in the script line is the one the generator gave you. Check the course is public, the event is published, or the publication has embedding turned on. |
| It works on one website but not another | If you use Allowed websites, add the website exactly as it appears in the browser's address bar, including www. if it has one. The browser's developer console will show a CORS error for a website that isn't on the list. |
| It stops working on Wix after you set Allowed websites | Wix runs the code in a frame on its own address. Add that address to the list (the CORS error in the developer console names it), or leave the list empty. |
| The website builder removes the script | Some builders strip <script> tags from ordinary text blocks or only allow custom code on paid plans. Use the builder's dedicated HTML, Code or Embed block. |
| You use a custom domain and nothing shows | Copy the code again from the generator, so the script line uses the address your team serves embeds from. |
| A change hasn't appeared | Wait about five minutes, then reload the page. |
| The cards look squashed | Choose fewer columns, or Auto, or the List layout. |
| A course list shows "Nothing to show yet." | No public courses match the topic, language or type you chose. |
Frequently asked questions
Can visitors sign in or see their progress in an embed?
No. Embeds are public. Visitors sign in on your Continuum site when they enrol or buy. If your website runs WordPress and you want members to sign in once, see How to connect a WordPress site to Continuum Learn.
Will an embed help my search engine ranking?
Google can read embeds, because it runs the script. Many other search engines and AI crawlers don't, so they only see the fallback link. If search visibility of a guide matters most, deliver it through the API instead. See How to put a publication on your website.
Can I put more than one embed on a page?
Yes. Keep one script line on the page and paste as many embed elements as you like.
Does it cost extra?
No. Website embeds are included on every plan.
Can I embed a course with its lessons and quizzes?
No. Courses with progress, quizzes and certificates run on your Continuum site, where results are recorded. Only publications can be shown in full on another website.
How do I find a course's id?
The generator fills it in for you when you choose a course. Otherwise it is the number at the end of the course's address when you open it in the course editor.